

CRITICAL STEPS IN THE PLASTIC INJECTION MOLDING PROCESS
Technological advances in plastic manufacturing have improved the efficiency and reproducibility of the injection molding process. Several repeatable steps in injection molding help achieve a quick turnaround and meet the ever-growing demand for plastic parts. Each step affects the outcome of the final product differently, and here's how:

CLAMPING THE MOLD
The injection molding process begins by clamping two clamshell-like pieces to the injection machine. A hydraulic-powered machine keeps both halves of the mold secured to prevent leaks from happening during the injection of molten plastic. Inadequate clamping pressure causes flashing defects near the parting line since molten resin leaks under high pressure.
Such flashing defects lower the quality of the plastic part and require manual trimming between cycles to remove the excess material. Fortunately, early identification and correction of the flashing defect causes prevent potential functional and cosmetic issues in the injection molding process.
INJECTING THE MOLTEN PLASTIC
Injection of the molten plastic begins once the clamping step is complete. Initially, pellet-shaped plastics are loaded and melted inside a heated container. Then, an injection molding press pushes the molten hot plastic into the mold cavity.
The right temperature creates a molten thermoplastic with adequate viscosity for laminar flow during the injection. High pressure ensures all the spaces within the cavity get filled while also pushing out air bubbles. The injection and clamp pressure should also balance to prevent plastic from escaping at the parting line.
HOLDING AND COOLING THE MOLTEN PLASTIC
The injected plastic is held under pressure for a variable amount of time after the right amount of liquid plastic fills up the entire mold. This holding phase ensures all the spaces get filled while the mold cools, preventing any sink marks from forming. Cooling then follows as water oil flows through cooling channels surrounding the mold. Over time, the plastic cools and sets correctly before solidifying into the desired shape.
EJECTION OF THE MOLDED PARTS
During the cooling phase, the plastic component usually shrinks and sticks to the walls of the mold cavity. An ejection mechanism in the molding unit forcefully pushes the part out after the clamping unit opens. Cutters remove any waste material on the component's surface for a defect-free final product. The collected waste material is later recycled to reduce material costs.
Once this process is established, than the process should be monitored to make changes to achieve the most robust, reliable, and repeatable manufacturing solution.
Planning a Production Project?

TYPES OF INJECTION MOLDING
The vertical and horizontal injection molding machines rely on the same working injection molding principle. However, each process has unique strengths in different industrial applications. Here is a closer look at each process to make the right choice for your project.
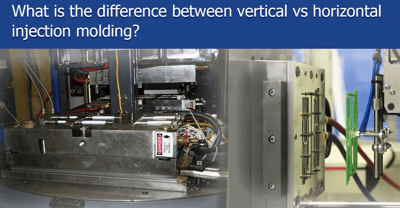
VERTICAL PLASTIC INJECTION MOLDING
The mold opens and closes on a vertical axis in the vertical injection molding. This configuration positions the injection mechanism at the top of the mold, allowing gravity to play a role in filing the mold cavities. The result is a consistent flow of molten plastic during injection and a quicker filling time. Also, gravity-assisted filling lowers the pressure and clamping force required.
The vertical machine also has rotary blades and open clamps in its design. These features allow the machine to operate with multiple concurrent processes during one cycle. You, therefore, get increased productivity, higher efficiency, and less manual intervention in between cycles with a vertical mold.
However, compared to horizontal molds, pieces don’t automatically fall out of the mold after being ejected. They require a robotic arm or human hand to remove them from the mold once cool. Yet, this step can contribute to an inconsistent cycle time, which could cause damage to parts after removal.
HORIZONTAL PLASTIC INJECTION MOLDING
The mold moves side to side when opening and closing in horizontal injection molding. Due to this horizontal axis, gravity doesn’t influence the flow of molten plastic. This requires the injection machine to exert adequate pressure to fill the mold cavities.
However, the horizontal orientation of the mold lets the molded part fall off once the mold halves separate. The part, therefore, doesn't require manual extraction upon ejection. The horizontal molds are also designed with extra cavities to allow for the production of more plastic parts per cycle. This feature is excellent for projects that require a higher volume of parts.
OVERMOLDING VS. INSERT INJECTION MOLDING
Most products in our modern world combine thermoplastics and metal components to make a single product. While several processes can achieve this effect, over-molding and insert injection molding have become popular, cost-effective options. Here’s how they differ.
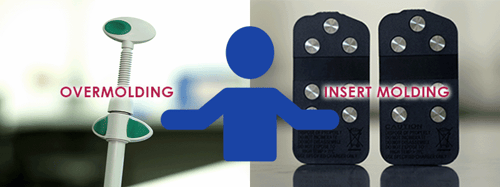
OVERMOLDING
The overmolding process involves a combination of different thermoplastics to make a single product. Manufacturers use overmolding to create plastic parts with rubber handles as a feature. The process begins with injection, leaving the first layer to cure. Subsequently, a second layer gets added, forming a single solid product. Overmold layers can be more than two, depending on your end-product design.
Usually, a rigid plastic forms the base, while a thin, rubber-like thermoplastic elastomer forms the outer layer. Thus, overmolding is good at improving the function of a tool. For instance, the process can add a soft plastic handle on top of the hard metal screwdriver. This also eliminates the need for parts assembly adhesives to fuse different plastic components.
INSERT INJECTION MOLDING
The insert molding process shares several steps with conventional injection molding. Both involve the melting and injecting of molten plastic resin into a mold. The main differentiating factor from overmolding is adding more inserts to the mold as an extra step. This insertion may involve a human hand during low-volume production or a robot arm when high-volume production is requested. You can use this process to make parts with strong insert attachment points, improving the component’s overall strength.
However, the mold used in insert molding needs a protective design to prevent high pressures and temperatures from damaging inserts. Damaged inserts make the entire product non-functional. Therefore, throughout the entire process, the position of the insert shouldn’t change. Firm placement of the insert — while the injected plastic cools — prevents any degree of displacement.
The process showcases its versatility, as it can produce simple products to highly intricate parts. Industries such as the health sector have become major beneficiaries of insert molding. Medical sutures, implants, prosthetics, surgical blades, and dental instruments are products made from insert molding.
Other advantages of insert molding include:
- Reduced assembly cost
- Increased design flexibility
- Reduced material waste
- Improved design strength
CLEANROOM MOLDING
Cleanroom molding involves using a special room to reduce the risk of contamination while making plastic parts. This unique environment allows the plastic parts to remain as clean as possible during manufacturing. High-efficiency particulate air (HEPA) filters remove airborne particles from the air, reducing the likelihood of adverse effects occurring in the molding process. Depending on your injection molder, external agencies annually examine and calibrate Cleanrooms to maintain the grade.
The design of a cleanroom is to control the molding process environmental condition like humidity, pressure, and temperature. This consistent environmental condition allows the maintenance of a stable molding process. Industries such as the pharmaceutical, medical, biotech, and military industries can rely on cleanroom injection molding to make special parts.
Cleanrooms exist in several classes, ranging from Class 1 as the most sterile to class 9 as the least sterile. A more sterile cleanroom is ideal for plastic parts with extremely low tolerances for foreign debris, such as microscopic lenses. You can perform most plastic injection molding processes in Class 8 or 7 cleanrooms.
- Class 8. On site, you’ll find portable tenting surrounding the molding equipment while the room gets maintained under positive airflow. This regulation helps the injection molder achieve an ISO 146441-1 standard.
- Class 7. This Cleanroom has more stringent standards when compared to a Class 8 Cleanroom. Hard walls enclose and separate the injection molding area from the rest of the floor shop. Air in this room also gets constantly cleaned and replaced to keep particular matter low inside the room.
PLASTIC INJECTION MOLDING POST-PROCESSING OPERATIONS
Plastic parts are ready for assembly after the injection molding process is complete. These parts undergo secondary processes to remove surface defects, add decorations, or join components. Here are some common post-processing operations done on plastic parts after injection molding.
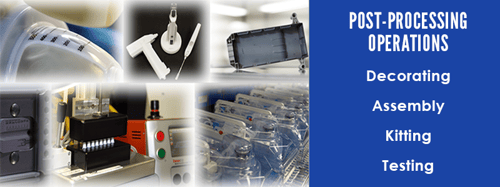
PART DECORATION
Once manufactured, plastic parts are sometimes left bare after being ejected from the mold. However, consider decorating the part if you want to add aesthetics, directions, or identification. Manufacturers regularly use pad printing, laser marking, and inkjet printing as traditional methods for decorating parts.
PAD PRINTING
The pad printing process uses a silicone pad to transfer 2-D images or text onto a 3-D object. Rigid parts with round surfaces are effectively stamped since the silicone pad wraps around the shape of the item without distorting the text or image.
LASER TECHNIQUES
Laser marking techniques offer a fast option to decorate your plastic component. This method leaves high-resolution effects on the injection molded part without requiring prior surface preparation. Other common laser techniques include:
- Laser etching. This laser technology delivers a high level of energy to a small area. The area then melts and expands, producing a raised marking on the plastic surface. Commonly, etching makes permanent markings for serial numbers, barcodes, and matrix codes.
- Laser engraving. This laser technology uses a laser beam to physically remove sections of the plastic surface. The result is a cavity with the desired text or image.
INKJET PRINTING
Plastic injection molding and mold builders in the USA use inkjet printing to provide a non-contact, accurate form of printing. The ink used has unique characteristics to improve the outcome of the print. For instance, it has fast-drying properties, making it adhere to the substrate surface quickly. Also, the ink is resistant to oil and heat to prevent any smudging that may result in printing unclear images. Colored and pigmented ink produces nearly photo-quality texts or images with high contrast on darker surfaces for enhanced readability.
PART ASSEMBLY
Most injection molded parts have an almost finished appearance after molding is complete. However, you may sometimes need to combine the parts to produce a more detailed final product. Post-molding assembly is a great way to achieve this goal. Some of the methods used include:
1. Ultrasonic Welding
Ultrasonic welding utilizes high-frequency acoustic vibrations to weld two plastic materials against each other. A horn transmits this ultrasonic sound to the molded plastic while the parts get firmly held together in a fixture. This post-assembly process requires no extra material to bond parts.
The adhesive process uses a material to bind two parts without chemically altering the plastics, which is sufficient for most plastics. Alternatively, solvent bonding uses a liquid material that coats and softens each plastic enough to bind with a press. As the solvent evaporates, the plastic molecules mix to form a permanent bond. This process only works well with thermoplastics.
2. UV BONDING
UV (ultraviolet) bonding uses high-intensity lighting to dry or cure adhesives or coating. The process is much faster in forming permanent bonds, increasing production quality, and reducing rejection rates. However, in the design, you'll have to select a transparent resin that allows UV light to pass through it effectively.
3. MECHANICAL FASTENING
Consider mechanical fastening if you want to disassemble the bonded injection molded parts later easily. Commonly used mechanical fasteners include nuts, screws, rivets, and bolts. Plastic parts requiring frequent disassembly have threaded metal inserts to increase thread durability.
KEY CONSIDERATIONS WHEN CHOOSING AN INJECTION MOLDING PARTNER
As a product manufacturer, picking the best supplier from numerous available injection molding companies in the U.S. can be nerve-racking. Partnering with an injection molder that will deliver the specified plastic parts on time and within the budget ensures you have peace of mind. Below are a few key considerations when selecting an injection mold partner for your next project.
VOLUME AND CAPACITY SPECIALIZATION
You can narrow down your options when choosing an injection molder based on the size and volume of your requirements. A low to moderate-capacity molder specializes in producing below 10,000 units. This supplier is an ideal choice when looking to create a prototype for part testing quickly. High-volume injection molders can deliver up to 750,000 units. The injection molds are uniquely small to facilitate high-volume production runs.
DETERMINE THE REQUIRED PRESS TONNAGE
Injection molding machines utilize extreme pressure to accomplish the highly technical plastic production process. The mold experiences two opposing forces that keep the mold open when injecting the molten resin. The clamping force that holds the mold together is expressed in tons.
An injection molder that understands how to pick the right press tonnage will improve the efficiency of plastic part production. Ideally, a larger injection molding machine exerts more clamping force than a smaller one. However, bigger isn’t always better. The surface area, part depth dimension, and melt flow contribute to the final tonnage for injection molding.
Excess tonnage can be risky for the machine, mold, and product. Flashing can occur, which contributes to excess material forming on the part edges. Using too little clamping force also causes production problems. At Crescent Industries, we utilize a press tonnage calculator tool that provides a close estimate of the tonnage needed to meet your plastic part needs.
COMPLIANCE TO DESIGNS
Having to compromise on your product specifications can ultimately alter production quality. Regardless of the specs, a top-notch injection molder can create plastics without sacrificing the details. If unavoidable, your supplier can provide appropriate recommendations to keep the changes minimal. Some of these changes include resin substitutes and minor design tweaks that reduce the lead time and lower production costs.
INJECTION MOLDING QUALITY SYSTEMS
Quality control is important for most injection molding companies. Customers often judge companies based on the products or devices they sell. Regaining the consumer's trust becomes challenging whenever a faulty product reaches the market.
The automation of Injection molding at times makes the process error-prone. Failure to quickly notice an issue in the injection molding line may result in part rejection and material wastage. Implementing effective quality control systems allows for early detection and correction of the identified issue(s).
ISO 13485 is a great quality control system for medical devices. Injection molders with an ISO 13485 certification will likely produce medical components ready for their intended purposes. Make the right call and choose quality for your injection molded plastic parts by working with an experienced manufacturer like Crescent Industries.
FACTORS INFLUENCING THE COST OF PLASTIC INJECTION MOLDING
Knowing all factors that affect the cost of your injection-molded plastic is vital. The outcome helps you determine which plastic injection molding and mold builder in the USA to work with in producing a cost-effective component. It also assists you in settling on the best-selling price of the final product. Important factors to consider include:
MOLD MATERIAL USED
The type of metal used in mold creation influences the final cost of your mold. Various steel grades offer different service lifespans. Durable steel makes molds with longer lifespans, offering better value. Plus, you'll refrain from conducting frequent maintenance services or replacements whenever the mold deteriorates. When selecting the best steel grade for your mold, consider the following:
- Thermoplastic melting point
- Surface finishes
- Cycle time
- Production volume
The best steel grade for your mold is tool steel, known for its durability and resilience. Alternatively, aluminum could be a cheaper alternative, especially for injection molding projects with low production runs.
RESIN SELECTION
The type of plastic resin used in the injection molding process has a big influence on the cost. Your resin selection changes price based on quality, availability, grade, additives, and molding temperature. The resin choice also influences mold maintenance frequency, increasing the overall cost. For instance, resins that contain abrasive compounds such as carbon or glass require a more durable and expensive mold.
QUALITY REQUIREMENTS
The injection molding process may produce defects on parts ranging from cosmetic to critical. Depending on your industry’s standards, some defects are acceptable. However, industries such as the medical industry prioritize safety, thus requiring quality validation. This part inspection requirement adds to your overall cost after production.
The process uses trained personnel to validate the quality of injection molded parts. Whenever an element doesn’t meet the standard, the team then investigates to identify the area causing the defect. Fortunately, this service forms part of your initial order at no extra cost when working with Crescent Industries.
MOLD MANUFACTURER LOCATION
The location of your mold manufacturer influences shipping and handling costs, contributing to the overall injection molding costs. For instance, when you decide to use foreign mold manufacturers, you may consider the minimum wage provided in that country, as a higher wage raises the overhead cost of your injection mold.
Despite the initial cost being low, manufacturers often face challenges with language barriers and delivery times upon shipping. Sometimes extra tooling is necessary to repair or modify once the tooling arrives in the country.
To avoid these barriers, select a reliable plastic injection molding and mold builder in the USA, like Crescent Industries, that can conveniently handle your injection molding projects. We are strategically situated near four major airports.
Evaluating Cost & Production Risk?
Injection molding cost isn’t just tooling; it’s lifecycle performance, validation requirements, secondary operations, and long-term production stability. For medical, defense, and precision industrial programs, early evaluation of compliance requirements, projected volumes, and tooling strategy can prevent expensive revisions later. If you're comparing suppliers or preparing a capital investment, you may request a confidential project assessment to determine alignment and next steps.
